Intro to Engineering
As part of Project Lead The Way during my freshman year of school, I took Introduction to Engineering. This year-long course provided a solid understanding of engineering basics from which I was able to start really advancing the work and projects I did at home and at school.
Here are the projects I completed...
Design A Game Project
The design a game project was meant to teach me how to use the design process and so I could demonstrate that I learned how to use it. The project required that I go through many activities that showed me how to create a solution for problems. In this project the problem was that I needed to create a carnival game that had a 25% chance of the bag landing in the grand prize target. So I went with a classic catapult launcher game, where you put the bag in the catapult and it will launch it to the target trying to make it in the grand prize hole.
Project Charmed
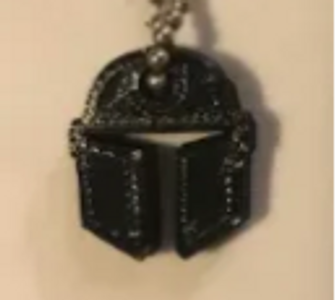
Project charmed was part of our unit where we started learning how to do isometric sketching, and to sketch our projects with dimensions. We downloaded and learned to do the basic things in Fusion 360. We learned Multiview drawing and the fundamentals of dimensioning. To demonstrate our learning we did Project Charmed. We had to make a Charm to go on a key chain for a client. My client was my dad.
My Design in Fusion 360: https://skfb.ly/6WDs6

Design a Protective Case
In this project, we had to design a case for something so that that thing could be carried around safely. For my object, I decided to build a protective case for masks, so people could have a place for them to store their masks, so they don't forget them. My design has two compartments, one for clean masks and one for dirty masks. The design name is "the upside down", it has one compartment on top, and the other on the bottom.
Base Design - Link: https://skfb.ly/6XDrC
The Upside Down was made in two parts the base part and the tops. The drawings will show different views of each, and the measurements.
Top Lid Design - Link: https://skfb.ly/6XDrH
I had an issue when creating it in Fusion 360, my final design if printed the parts would not work together cause Fusion wouldn't let me edit the part to make them fit. To fix this I would have had to start over from scratch, which I didn't have the time to do for this specific assignment before the deadline but I did learn from that mistake.
Assembly Design Project
In this project, students were supposed to use different aspects from past projects to create a design and prototype of a 3 Dimensional, interlocking assembly that is geared toward an audience of their choice. This assembly can be a puzzle, a model, a representation of something, artwork, wearables, 3D symbol representing a cause, etc.
My audience is players of a video game Rocket league, which is a game where cars fly and play soccer against other cars.
This project took me about 6 hours because when I was designing it I ran into a little problem in the middle. The problem was that I had gotten overconfident with my design and choose one that was super complicated and was way above my current level. My original concept from being a car made of multiple parts that made it 3D. Instead, I choose to do a 3D puzzle of 3 different parts two cars and 1 ball. Each part is a separate component, they come together using tension and an interlocking system, so when the part is laying down they can't come apart from each other.
Each part is a separate component. They come together using tension and an interlocking system, so when the part is laying down they can't come apart from each other.
There are 4 drawings: 1 full Assembly, the others for each component
1 Ball, 1 Octane, and 1 Dominus.
You can find them at: https://skfb.ly/6YVZy
Reverse Engineering Analysis Project
Visual Analysis
Product: Wind-Up Octopus Toy
Primary function: To move in a linear line, while the main body rotates, and to provide entertainment for children.
Fictional Analysis
Guess as to how the wind-up octopus works: My guess as to how the octopus works are that the inner legs are connected to a main gear, which is connected to other gears on the main body. When the knob is turned the gear moves to cause the inner legs to stand still on the ground and the gears connected to the main body to rotate around the main gear creating the rotary motion of the octopus. The outer legs are in a position so that when the main body rotates it hits the ground moving the octopus slightly forward creating a linear motion. The starfish's motion is just an illusion it isn't actually moving but looks as if it is because the main body moves up and down when rotating.
My hypothesis for mechanical parts in the wind-up toy is gears rotating around gears creating a rotary motion.
Inputs
1. Nob being rotated multiple times then let go of
2. Inner leg standing still on the ground.
3. Main body rotates around the gears inside.
4. Outer legs hit the ground.
5. Inner legs get to a new position.
Product Function
1. Starts gears and other parts creating the motion.
2. The ground stops the inner legs from rotating which then causes the main body to not stay still but go in motion.
3. Outer legs hit the ground at an angle causing the inner legs and their attached parts inside to move forward with the main body.
4. The gears get back to the original position and the whole process gets started over, besides the turning of the knob unless necessary.
Outputs
1. Starts the entire mechanism of the wind-up toy and begin its motions.
2. Main body rotates instead of the inner legs.
3. Entire Octopus moves in a linear path a tiny bit.
4. Whole loop starts over again.
Motion Step Sequence
- The plastic knob is rotated, rotating the spiral gear, which winds up the sheet of metal.
- The knob is released, and the sheet of metal tries to unwind turning the gears in the opposite rotary direction and then turning when winding it up.
- The large gear turns the medium gear and small gear in a rotary motion inside the motor.
- The small gear when rotating hits the resistance creator causing the resistance creator to move in a reciprocating motion, which slows down the gears and keeps them in rhythm.
- The medium gear is connected to the spinner so when the medium gear turns the spinner also turns in a rotary motion.
- The spinner tries to turn the pole connected to the inner legs and Starfish but it doesn't have the strength to because they are touching the ground. Instead, because the motor is held in place by the back shell it moves the front shell and back shell in a rotary motion.
- When the front and back shell's legs hit the ground they push the whole toy forward in a linear motion.
- Then it goes back to step 3 and repeats until the sheet of metal is fully unwounded.
Structural Analysis
For this part of reverse engineering, we had to take apart the wind-up toy to see how the inside worked. My hypothesis for how it worked was basically correct, and everything worked how I predicted. I didn't go into details on the motor but it would have been hard to predict how that part works.


Automata

In this project, our goal was to design working automata (a moving mechanical device made in imitation of a human being) for a toy company.
My design was two clones saluting.
At first I over complicated my design and then realized I had to simplify the design.

MY 3D Models in Fusion 360

Motion Graph for Cams
I only used one cam for this so there is only one motion graph.
Final Physical Prototype
